xo Sue & Shelly

Goodbye 2012
Dec 31, 2012
2012 has been so good to us here at As It Seems. This little blog started off the year as Hello. Also, I love you. and I was the only author. Aaron and I added Twink to our family on January 2nd (talk about starting it out right). Later in January I opened up on my blog for the first time about my divorce. As painful as that experience was, it helped make me the person I am today. I finally wrote about it because I wanted others to know that it does get better. In February I participated in a short story challenge that was so much fun. In March poor Twink had surgery and I celebrated my 26th birthday. I'm a believer in birthday week because one day is just not enough to celebrate a person. In April I talked about reaching out to other bloggers. I used to be so good at that and I'm resolving to be good at it again. I know I'm not the only one who wants to connect with others. In May I did not one, but two home tours. They're different though! I also officially became As It Seems. In June I shared an easy keyboard makeover to make your computer a little more fancy. I also became an aunt to the most beautiful little girl, Elizabeth Ann, and one week later I found out I was pregnant. And that's when my blogging lull hit, because my pregnancy made me so sick that I could barely move from the couch most days. In July Twink turned 1 and we celebrated in style. In August I announced my pregnancy for the whole wide world to know. Also, my BFF Jessi came to Japan to visit and we had many awesome adventures despite my awful sickness. In September I hit the halfway point in my pregnancy and found out we're expecting a BABY GIRL! We also added Tally to our family. She's a handful but we love her. In October we went to the Air Force Ball and celebrated Aaron's 27th birthday (isn't it nice of him to be older than me?). In November my fabulous sister Shelly joined me as co-author of this little blog and she shared her very first AIS blog post, a delicious pumpkin cake. Aaron and I also celebrated our first (of many!) wedding anniversary. December ended our fantastic year with a DIY for (easy) custom made canvas and an insanely delicious recipe for banana bread. And of course, our AIS holiday card! Shelly and I have both been so blessed this year. We hope you've all had a beautiful one, too. And Happy 2013!
Dec 22, 2012
2012 has been an amazing year. We've both been so blessed. We've experienced a few big milestones in our lives and we look forward to many more. We hope that your holidays are filled with love and joy. From our hearts to yours, Merry Christmas & Happy Holidays! xo Sue & Shelly


Dec 21, 2012
A few weeks ago Carolyn over at Full-On Fit emailed me about doing a guest post. Since Shelly and I joined forces we haven't had any guest posters but we definitely still love them! Carolyn wanted to share her personal experiences with keeping children healthy and as a soon-to-be mom I couldn't say no to that. I can always use a few extra tips (and the overprotective parent in me loves them). I hope you enjoy her tips as much as I did! xo Sue
Keeping Kids Healthy: Type 2 Diabetes Prevention Tips
In addition to Thanksgiving and the start of the holiday season, November was American Diabetes Month. Although in the past this wasn’t something I paid much attention to, my family’s world was turned around when my little cousin was recently diagnosed with Type 2 Diabetes. After doing some research on how to help her, I was astonished to find that this type of diabetes is way more common in children than it was just 20 years ago! According to Centers for Disease Control and Prevention, at least 3,700 children are diagnosed with Type 2 Diabetes, and this number continues to grow each year as lack of physical activity and obesity rates rise in children.
Although Type 2 Diabetes can be caused by genetics, for most children, it's brought on by poor eating habits, lack of physical activity, and being at an unhealthy weight. The good news is that diabetes caused by these three factors can be prevented with simple changes in diet and exercise.
The right kinds of food
Foods with whole grains, such as oatmeal, whole wheat bread, and brown rice help stabilize blood glucose levels. Daily servings of three to five fruits and vegetables provide nutrients children need, with fruits satisfying their sweet tooth. Look for antioxidant-rich produce that's high in fiber, such as berries, tomatoes, sweet potatoes, leafy greens, and beans. For additional food options, check out the American Diabetes Association.
For fun ways to get kids eating healthy, have them help out in the kitchen. Make healthy "ice cream" by sweetening plain yogurt with honey or agave nectar and freeze it. Let the kids make toppings with fruits and nuts. Also, get their input into what they would like for dinner or a snack that night – and then adjust their suggestion if need be.
Get your move on
Getting active can be fun, too. Have the whole family engage in sports such as indoor basketball or martial arts. Depending on where you live, let children go out and play in the snow for a couple of hours, or have races on the beach. Yoga is also a fun, unique way of getting children active. It not only increases flexibility, but studies have shown that it can lower stress levels, another factor that can bring about Type 2 Diabetes. Best of all, it can be done indoors when the weather outside is too cold.
Cardiac surgeons from St. Joseph’s Hospital Cardiac Center warn that proper preventive care is key to children living full, healthy lives. These measures not only help prevent Type 2 Diabetes, but they also can be used to avoid heart disease, high cholesterol, hypertension, and many other serious diseases. With the holidays upon us, it’s the perfect time to maintain your child's health by providing them with food that's both nutritious and yummy for them!
Carolyn is a 20-something year old with a passion for life, fitness and overall well-being. She is an avid cycler, golfer and has been known to bust some serious moves on the dance floor. Check out Carolyn’s blog, Full-On Fit!
********************************************************************
In addition to Thanksgiving and the start of the holiday season, November was American Diabetes Month. Although in the past this wasn’t something I paid much attention to, my family’s world was turned around when my little cousin was recently diagnosed with Type 2 Diabetes. After doing some research on how to help her, I was astonished to find that this type of diabetes is way more common in children than it was just 20 years ago! According to Centers for Disease Control and Prevention, at least 3,700 children are diagnosed with Type 2 Diabetes, and this number continues to grow each year as lack of physical activity and obesity rates rise in children.
Although Type 2 Diabetes can be caused by genetics, for most children, it's brought on by poor eating habits, lack of physical activity, and being at an unhealthy weight. The good news is that diabetes caused by these three factors can be prevented with simple changes in diet and exercise.
The right kinds of food
Foods with whole grains, such as oatmeal, whole wheat bread, and brown rice help stabilize blood glucose levels. Daily servings of three to five fruits and vegetables provide nutrients children need, with fruits satisfying their sweet tooth. Look for antioxidant-rich produce that's high in fiber, such as berries, tomatoes, sweet potatoes, leafy greens, and beans. For additional food options, check out the American Diabetes Association.
For fun ways to get kids eating healthy, have them help out in the kitchen. Make healthy "ice cream" by sweetening plain yogurt with honey or agave nectar and freeze it. Let the kids make toppings with fruits and nuts. Also, get their input into what they would like for dinner or a snack that night – and then adjust their suggestion if need be.
Get your move on
Getting active can be fun, too. Have the whole family engage in sports such as indoor basketball or martial arts. Depending on where you live, let children go out and play in the snow for a couple of hours, or have races on the beach. Yoga is also a fun, unique way of getting children active. It not only increases flexibility, but studies have shown that it can lower stress levels, another factor that can bring about Type 2 Diabetes. Best of all, it can be done indoors when the weather outside is too cold.
Cardiac surgeons from St. Joseph’s Hospital Cardiac Center warn that proper preventive care is key to children living full, healthy lives. These measures not only help prevent Type 2 Diabetes, but they also can be used to avoid heart disease, high cholesterol, hypertension, and many other serious diseases. With the holidays upon us, it’s the perfect time to maintain your child's health by providing them with food that's both nutritious and yummy for them!
Dec 17, 2012
One of my favorite things in the morning is a hot breakfast. It just gets me going right away. The downside to that is having to wake up and make that hot breakfast. The solution? This easy breakfast casserole. It cooks in the crock pot while I sleep and is absolutely delicious. I originally found the recipe here but modified it a little bit to fit my taste. Because lets be honest, everything is better with sausage or bacon added.

Crock Pot Breakfast Casserole
- 5 cups frozen hashbrowns
- 1 package cooked bacon or sausage
- 2 cups grated cheddar cheese
- 1 cup milk
- 1/2 cup half and half
- 1 tsp salt
- 1 tsp pepper
Mix all ingredients into your crock pot. Cook on low 6-8 hours. Wake up to a delicious, hot breakfast. The pictures below are after it was done cooking, the top was before I stirred it all up and the bottom was after. It looks like mush. It tastes amazing. Aaron requests this all the time now.


xo Sue
Dec 13, 2012
So Christmas is coming quickly and I am thinking of possible presents for friends and neighbors. I want to make something easy and simple that others will hopefully enjoy! Every year my mom makes plates of Christmas cookies to take to friends and I would like to start something like that this year. I was thinking of what I could make and one of my go-to recipes came to mind. I love banana bread and it is very simple to make! I think there will be a slice or two on my Christmas treat plates this year! As we get closer to Christmas I will post more recipes of goodies that I will include on my gift plates :)


I hope you enjoy banana bread as much as I do!!!!
Banana Bread
Ingredients:
1 cup Sugar
1/2 cup Butter
2 Eggs
1 tsp Lemon or Lime juice
4-5 mashed ripe Bananas
2 cups Flour
1/2 tsp Baking Soda
Directions:
In a mixing bowl cream your sugar, butter, eggs and lemon juice.
Add bananas and mix well.
Sift in flour and baking soda. Beat until blended.
Pour into a greased loaf pan. Bake at 350 for 1 hour.
When it is golden brown and firm in the middle it is ready to come out. You will be able to see very easily if the middle isn't cooked through. Let it cool for half an hour before you remove it from the pan.
Place on a cutting board and slice it up. You can add it to a plate of goodies for neighbors or keep it all for yourself!
Here is a helpful tip: I like to make this every month or so and slice it up. I keep out a few slices to eat for the next couple of days but I will put the rest in sandwich bags and throw them in the freezer. I found that if I put a whole loaf in the freezer I never pull it out... so I place them in individual bags so I can pull one out at night and then enjoy it for breakfast the next morning!
I hope you enjoy banana bread as much as I do!!!!
xo Shelly
Dec 12, 2012
I've been nesting! My daughter's room is my favorite room in the house and it's not even done yet. It's been a little frustrating because everything I've wanted I've had to order online and the waiting on overseas shipping makes me crazy. I can find decor here but the big things (like furniture!) have been much more difficult. My favorite part of decorating her room has been my DIY projects. It makes me feel like I'm really creating this space for her. They've all been very simple but I've learned that things don't have to be extravagant or difficult to be beautiful. So far these custom canvas quotes have been my favorite project and after sharing them on Instagram I've had numerous requests for the tutorial. So by popular demand, I give you my insanely easy custom canvas quotes tutorial.

blank canvases
paint brush
mod podge (I used satin, a great mix between glossy and matte)
quality printed photos (I made mine on PicMonkey and ordered them from Shutterfly)
Start by painting the blank canvas with a thin coat of mod podge. Lay your photo on the canvas and flatten it out so there are no bubbles. Cover the entire photo with mod podge, going over the edges to make smooth lines. Let it dry completely. Hang your canvas photos anywhere you want and enjoy the beautiful finished product!


I used 5x7 canvases and photos because I didn't want them to take away from the rest of her room, just add a little something special, but you can use any size you like. Also, be sure your photos printed are a good quality. The first ones I had printed at a tiny local store in Japan were terrible. They bubbled and peeled and curled in on the edges. The prints from Shutterfly were perfect and gave me no trouble at all. I've also made something similar to this with photos printed on my own printer and they worked great as well. As long as you have quality photo paper this project will work well.
xo Sue
Dec 11, 2012

I've always thought that Shelly's name fits her so well. It's a warm and happy name and that fits my bubbly younger sister completely. Her dimples are ridiculously cute (all 6 kids in our family have them but Shelly's are by far the most prominent) and because of that her smile makes it impossible not to smile back at her. She'll probably be embarrassed when she reads this because she doesn't know I'm writing about her. Oops! Her precious baby Elizabeth was named perfectly, too. It such a classic, sweet name and the nickname, Lizzie, is the picture of a bundle of joy- which she definitely is!
How do you pick a name for your baby? It has been such a daunting task for us! Suddenly I felt like every name I had ever liked was terribly wrong for my daughter. People ask me how we picked ours and I honestly don't have a good answer. I'm still not sure how we found her name. I think I heard it years ago and it just sort of stuck with me. But our naming process went something like this.
We found out I was pregnant. We started talking about both boy and girl names. We picked middle names first (I know, we're strange). We made a huge list of potentials. We crossed off more than half almost immediately. We narrowed it down to 2 or 3 for each gender. We found out we're having a girl. We debated between 2 for weeks. One of them just sounded right to my ears and my heart so I started calling her by it out loud. Aaron got on board. Now we have our daughter's name. But it was a process!
So tell me, what names do you love? And how did you end up picking them?
xo Sue
Dec 5, 2012
I really do love to cook. What I don't love is deciding what to cook (or cleaning up after myself but it's part of life). So last week I was making my grocery list and having a hard time actually putting anything on it. I opened up my Pinterest food board and told Aaron to pick two things he wanted me to make. I didn't have to decide and I still got to cook delicious food. Win-win.
My husband is from Kansas City, Missouri and they take their BBQ very seriously there. He spends the entire summer grilling for me and I love it. When winter strikes I rarely get home cooked burgers, steaks, or ribs and I definitely miss it. So when Aaron said he wanted me to make him ribs I was a little nervous. He's very picky about his BBQ (and now so am I)! But I found this recipe for crock pot BBQ ribs and decided I'd at least give it a try. Now I'm so glad I did because we definitely have a new favorite in our home.

Crock Pot BBQ Ribs
- 2.5 lbs ribs (approx)
- 1 1/2 Tbsp paprika
- 1 Tbsp brown sugar
- 1/4 tsp chili powder
- salt & pepper to taste
- 1 cup BBQ sauce (your favorite kind)
Mix paprika, brown sugar, chili powder, and s&p together in a small bowl. Rub the mixture all over your ribs, covering both sides.

Put the ribs in your slow cooker by propping them up against the sides, thicker side down, meat side against the wall. Pour BBQ sauce all over the ribs. Cover and cook for 6-7 hours on low. Line a baking sheet with foil and move the ribs from the slow cooker to the baking sheet, bone side up.

Strain all the remaining juice from the slow cooker into a small sauce pan. Bring it to a boil and simmer to reduce the sauce, about 15 minutes. Turn on your oven broiler. Brush the ribs with your sauce and broil about 4 minutes. Flip the ribs over, brush them (generously!) with sauce and broil for 8-10 more minutes.

Serve any remaining sauce on the side with the ribs. And enjoy! Seriously, these pictures do not do the ribs justice (sorry, they're from my iPhone!). If there is one recipe from our blog that you ever try this should be it. Aaron is already asking me to make it again.
xo Sue
Dec 2, 2012

Every morning I walk by her room and this is what I see.
And every day it gets just a little bit closer to the day we get to bring her home.
This will be her special place.
I want her to always feel safe here.
The world is a big, scary place but her home will be a happy one.
I've taken so much joy in creating a room for her.
I've put together a place where we can spend time together as mother and daughter.
A place where we can laugh and play and read and sing.
A place where we can snuggle together as a family and forget everything else.
I can't wait to share it with her.
I can't wait to bring my daughter home.
xo Sue
Nov 29, 2012
Today I was feeling a little creative and wanted to do something fun for dinner. I have made pizza plenty of times and thought that would be a good option since I didn't have much time to make something fancy. So... I pulled up my trusty Pinterest boards and found the idea of making a Calzone! I pulled out my Momma´s pizza dough recipe, threw on a few ingredients and put it in to bake. It was quick and easy. Best of all it tasted delicious! Hope you enjoy!


Yummy Calzone!
Becky's Pizza Dough:
1 cup warm water
2 1/4 tsp yeast
1 Tbsp sugar
2 1/2 cups flour
1 tsp salt
Toppings:
Marinara sauce
Cheese
Pepperoni
(Anything you really want!)
1 egg
Parmesan cheese
Italian Herb mix
Directions:
1- Mix water, yeast, and sugar in a mixing bowl. Let it rise for a few minutes.
2- Add flour and salt. Mix for 3-5 minutes. Roll out dough into a rectangular shape (mine is not the best example...!) Preheat your oven to 425 at this point. Transfer to a baking sheet with a little bit of corn meal on it for easy removal- trust me! I forgot this step and regretted it later when I had to after I had made it all pretty!!!
3- Add your sauce down the middle length-wise. Sprinkle cheese on top of that.
4- Place pepperoni along the top of cheese. (Add any other ingredients that you would like in your Calzone) I put a little extra cheese I had shredded on top of the pepperoni.
5- Cut slits into the sides of your dough along both sides of the toppings. Try to make the same number of slits on both sides and keep them around the same width as much as your can.
6- Start folding the slices one by one, weaving them together.
7- Tuck the last slice under the bottom when you get to the end.
8- This is when I had to transfer it... but hopefully you did that before it looked this pretty! Mine stretched all funny once I moved it... Anyways, I will remember next time! Back to the recipe... Whip the egg in a bowl and brush it over the top of your Calzone. (My egg mixture got a little messy... sorry!)
9- Sprinkle a good amount of Parmesan cheese and Italian seasoning on top.
10- Bake on 425 for 15 minutes. Pull it out when the crust is looking brown and yummy!
11- Let it set for a few minutes so the sauce doesn't spill all over the place. Slice it up and enjoy!!!
Though eleven steps that I have listed may seem like a lot, it really isn't. I just broke it down really simply so I could add all the pictures that I took! It took me less than 15 minutes to put it all together and another 15 to bake. While it was baking I cleaned up my kitchen and had only a few small dishes left once we finished dinner. It worked out really well for a busy night!! Thanks for reading!
xo Shelly
My Growing Bump
We have less than 12 weeks left until Baby Girl's due date. When I think about that I freak out just a tiny bit. Mostly it's a good freak out, but it's a little bit nervous/scared too. I think I deserve the nervous/scared bit though. In 12 weeks I have to physically shove 8+ pounds out of my body through a hole that isn't exactly sized properly for that. Sorry. I tried to make that as non-gross as possible but we all know it is. And that's just part of life, right?
Moving on... I thought it would be fun to put together a collage of my baby bump so far. I have no idea why I decided to turn the opposite direction in week 20. Maybe I was feeling rebellious. Also, at the beginning I was planning on wearing the same outfit each week to watch it grow. Obviously I got bored of that pretty quick. I have pictures from before 14 weeks, but I feel like 14 was when there was a "real" bump there and not just something you pretended you saw to make me feel better, so that's where I started. And at the beginning I only took pictures every few weeks. Mostly because I felt like CRAP all the time and taking pictures was not my main priority. I've started to feel better in the recent weeks and although my nausea/vomiting isn't completely gone, it has become much more tolerable and I have no reason to complain. It's certainly better than back in July when I took a lovely trip to the hospital. It does get better! Sort of. (Can you tell I originally wrote this Saturday night just hours before my second trip to the hospital? Well played, life.)
So here she is. Our growing Baby Girl.

xo Sue
Nov 28, 2012
I love pictures printed on canvas. There's just something about them that's beautiful to me. I love that they don't need a frame and can stand on their own. I almost feel like I live in an art museum with canvas hanging on my wall. I wish I could be that fancy. So when we were given the opportunity to review a canvas print from Printcopia we were pretty thrilled about it!

I was so excited to receive my canvas print in the mail. It came just one week after the order was placed (I love when things ship fast). The ordering process was so easy too. Printcopia's website is very user friendly and they even do custom canvas sizes if you're looking for something specific. The quality of the printed picture is very impressive and I was surprised at the amount of detail put into the print. Of course the fact that the picture is of my baby makes it even more special to me. This beautiful canvas is something I will always treasure!

So, do you want one of your very own? Use the handy little gadget below and enter to win a completely customizable 8x10 canvas print from Printcopia.
a Rafflecopter giveaway
This giveaway is open for shipping in the continental United States only.


So, do you want one of your very own? Use the handy little gadget below and enter to win a completely customizable 8x10 canvas print from Printcopia.
a Rafflecopter giveaway
*We were given a free 8x10 canvas print in return for our honest review of the product. All opinions expressed are our own.*
xo Sue & Shelly
Nov 21, 2012
We've all heard (or been) pregnant women complaining. Pregnancy is no.fun. You're nauseous (if you're lucky like me that never goes away...), you ache all over, you're constantly tired (I slept at least 12 hours a day my first trimester), you can smell everything in a 10 mile radius, your back hurts every day, you can't sleep more than 4 hours straight, your hormones make you feel like a crazy person. Seriously, the list goes on (and every woman's list is different).
And yet somehow I love being pregnant. Because there is no feeling in the world that has ever come close to my daughter moving inside me. She does it all the time (and has for over 10 weeks now) and I get choked up every single time. It's the purest definition of magic that I can ever give. I never realized how much love I am capable of until this little miracle grew inside me. I now understand how much my Mommy loves me and it makes me appreciate her even more than I did before.
Most days I stare at my stomach in awe. Even though I know what's going on with my body I'm constantly amazed that she is there. She is tiny and perfect and she will be a part of this world so soon. We have just over 12 weeks left. That's it. I remember when I was 12 weeks pregnant, we'd just gotten our first ultrasound (I cried a lot) and I was feeling so icky that I was sure it would never end. Now the end is near and I'm feeling so many emotions that I can't even contain them all.
I wish I could share this feeling with my husband. When I'm busy vomiting in the toilet or staring at a blank wall because my body hurts too much to sleep, I sometimes think that he's so lucky he doesn't have to feel this way. Then Baby Girl will kick me (she ALWAYS knows just when I need it) and I realize that no, I am the lucky one. I get to feel this precious miracle moving, kicking, and rolling inside of me. If I rest my hand on my stomach she will move into it. If I sing to her she'll respond with wiggles. If I play music for her she'll kick in time with the beat. And no matter how I explain that to Aaron he can never truly feel the magic of it.
Somehow her wiggles make up for all the bad. They make it bearable. They make it all worth it. They even make me love being pregnant.
And just for fun, here's my little lady at 27 weeks! She's taking her sweet time popping out but I'm okay with that. She's my daughter which means she's extra stubborn and she'll do things on her own schedule. It's probably better if I just accept that now.
xo Sue
Nov 18, 2012
I know, colored jeans are so trendy. But they're so fun! And just because you're pregnant doesn't mean you can't be cute and trendy and have a little fun. I bought both the neon blue and hot pink jeans before I got pregnant (originally seen here). They're a little tight under my belly now but they still fit so I still wear them. I have a belly band I can wear with them to keep them up once they no longer button, but so far I haven't hit that point. The rest of these outfits are pre-maternity too (except my top in the very last picture, which has a big sparkly heart that I love). I didn't get super creative with these outfits, some days I just don't have it in me. But at least I got dressed! On sick days I really count that as a triumph. And yes, I'm wearing the same sparkly black shoes with all three outfits. They were my wedding shoes and I love them! And now my question to you my friends: What are/were your favorite pre-pregnancy clothes that you made work during pregnancy?


lace top: victoria's secret (about 3 years ago) // jeans: japanese boutique (similar) // shoes: rue 21


Nov 15, 2012
Okay, I don't know how many of you readers enjoy Thai food but my husband and I love it! Especially when you involve peanuts in the mix. I found this recipe on Pinterest... (big surprise) but have changed it up a little. I read the reviews before I attempted it and most people said they altered it. The first time I tried it, I stuck fairly close to the original recipe and it was okay, not fabulous. Well, tonight was my second attempt and I changed it up quite a bit and LOVED IT!!! This was what I was looking for the first time around so I am glad I gave it another chance. So.... here is my wonderful (if I do say so myself!) version of:


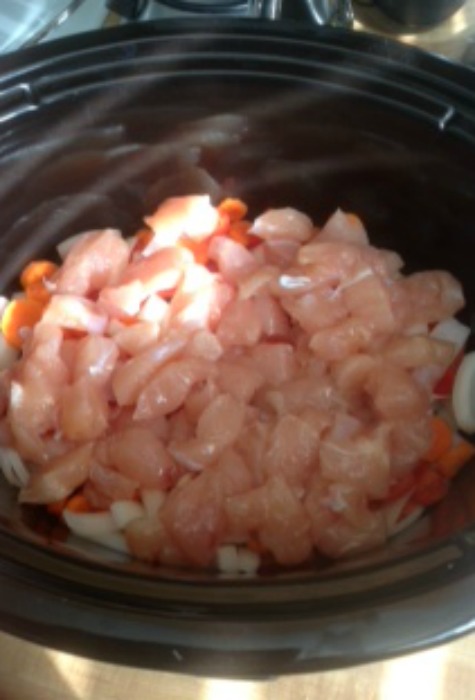


Thai Peanut Chicken Curry
Ingredients:
2 medium onions, cut into wedges
3 medium carrots, sliced
1 small red pepper, cut into strips
2 pounds skinless, boneless chicken, cut into small chunks
1 cup chicken broth
4 Tbsp chunky (or creamy) peanut butter
1/2 tsp finely shredded lime peel
2 Tbsp lime juice
2 Tbsp soy sauce
2 Tbsp quick cooking tapioca
1 Tbsp grated fresh ginger
4 tsp red curry paste
5 cloves garlic, minced
1/2 cup unsweetened coconut milk
1 cup frozen peas (I left it out this time because Aaron doesn't like them much)
chopped peanuts (optional)
Directions:
1. In a slow cooker add onions, carrots, and peppers.
2. Top veggies with chicken.
3. In a medium bowl, mix broth, peanut butter, lime peel, lime juice, soy sauce, tapioca, ginger, curry paste, and garlic well. Pour over the chicken and veggies. Cook for 5-6 hours.
4. Ten minutes before serving stir in the coconut milk (and peas if desired). Cover for 5 minutes more. Serve over rice and sprinkle peanuts on top.
Though there are quite a few ingredients in this dish it is worth it! Most of them save well until the next time you use them. My family has really enjoyed this tasty dinner and I hope that you will like it too! Let me know how your experience goes :)
xo Shelly
Subscribe to:
Posts (Atom)